Creating a memory book...Gift Ideas!
An activity I've found joy in recently is filling an empty book with my favourite memories. I'm a sentimental person and photos are the best way for me to remember moments that were particularly special.
It takes me back to the day, the sounds and environment and spending time working on these pages is pure joy. Especially when I'm revisiting a concert I've been to and I'm able to listen to it through YouTube in the background whilst I get creative.
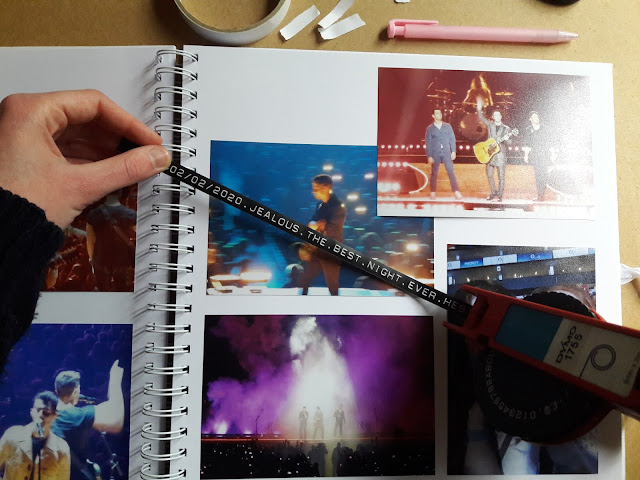
So far I've completed 2 pages and I thought I'd share some images from the process for those of you that love to create memory books too.
------------------------------------------------
I'll give you 3 guesses as to which band I went to see in concert last year...
…Jonas Brothers!
Seeing Jonas Brothers live was my favourite night of 2020 and was such a dream for ten year old me + twenty-one year old me. They sang music from their album Happiness Begins and songs from their Camp Rock days. When I tell you that it meant a lot to see them live, it really meant a lot. They put on an epic show like none I've seen before which resulted in exceptionally colourful photographs.
It's one of those memories that fill my heart whenever I think about or see via videos and photos. I'm confident I'll have this feeling throughout my life and so to really savour this I've dedicated a double page layout in my sketchbook.
I use (products linked):
- A spiral-bound scrapbook with a ribbon tie (Similar).
- Printed photographs from my phone using the app FreePrints
- Scissors
- Ruler
- An embossing label maker gun and tape (Similar)
- Bluetack (optional)
My style is simple and neat. I tend to let the images speak for themselves rather than crowd them with other colours and textures. This way, the eye is drawn to the vibrant photographs. That being said, adding a background can look amazing too depending on your style.
First I play around with the layout and secure the photos temporarily in place with blue-tack. Once I'm happy I secure double-sided tape to the back corners and stick them to the page.
I was lucky enough to have been given an old label maker, originally used for cassette tapes, and I used this for the text as my handwriting isn't very neat. This works really well for a music aesthetic.
Tip for label makers: check to see if the labels have a sticky back. I used a glue gun to secure these before realising that the back peels off.
This leads me to my second tip: stick the labels down with hot glue if you want a slightly faded effect in the lettering of the tape. This was a total accident but looks quite cool- just be careful not to completely cover the back in glue as wherever is covered will fade.
Previous post: Prints and Patterns - Etsy Shop Update!


Comments
Post a Comment