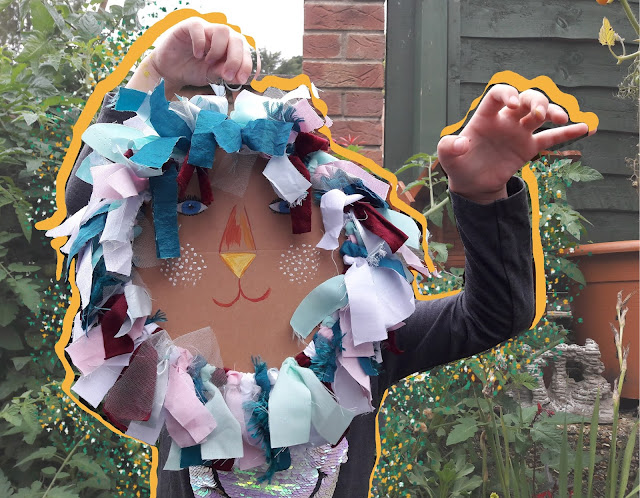
Girl About the House: Lions Wreaths / Tutorial
Tutorial: Scrap Lions, Wall art
Age: All; My nieces are 5 and 9 and both were able to do this independently. I enjoyed it too!
Average Time: 1hr 30mins
Recycled Materials: Fabric, Metal hanger, Cardboard.
During the Summer Holidays, I was lucky enough to hang out with my nieces who love crafting as much as I do. Their enthusiasm for anything creative prompted me to search through Pinterest where I found these lions.
They're made using scrap material, cardboard, paint, string, and a metal hangar. I was interested in the concept that the small pieces of fabric I've been hoarding could finally be used. So we sat in the garden under the sunshine, with our drinks and Hula Hoop crisps, and we made these lions together. *cue the cuteness*
I had a job of reading the instructions since they were in a language I'm unable to translate, so I thought I'd share how we made them. But just for transparency and full credit to the original, here's the link to the website I found: Milk Magazine
- Scrap fabric. Minimum size 2 x 15cm (length 15 to 20cm is best)
- A metal hanger per lion. Alternatively, a piece of wire (and pliers) which you will need to manipulate in a circle with a hook at the top.
- Cardboard (size slightly larger than the hanger when in a circle)
- Scissors; paper and fabric
- Pencil Case; ruler, pencils, eraser, paintbrushes.
- Paint in 3 different colours. Colours optional.
- Paint palette and a pot for water.
- String: 4 pieces per lion; size 6cm minimum
Steps:
1) Preparing the Lion.
Gather materials and set up your workspace. Manipulate your hanger into a circle. Alternatively if using metal wire, use pliers to twist a large circle and a small circular hook at the top.
2) Draw a precise circle on the cardboard by placing the hanger over the top and drawing around it. Draw a small arrow lightly with a pencil pointing up towards the hook. This is to ensure accuracy later on when painting the face.
Make sure to give the cardboard circle a 1cm border so that it's slightly larger than the hanger. Cut this out.
3) Pick your colour palette and cut multiple strips size 2 x 15cm of each colour.
4) Applying fabric to the wire.
Fold the strip in half, placing the looped end under the metal wire. Hold each end. Place two fingers in between the loop and grab the other end of the strip. Pull it through and tighten to the wire. Move it up the wire and repeat. See the photos below.

5) Repeat step 4 until there's no more space left to add any more fabric. Note that if you're making a pattern or later decide to add another colour, you can easily do this by moving the fabric along the wire.
6) Painting the face.
Start by using a pencil to draw the nose, eyes, mouth and dots for the whiskers.
Pour your paint onto the palette and go over the pencil lines with paint. Leave to dry.
7) Putting the Lion together. Now you will need to make four small holes at even sections around the lion. Do this roughly 1cm in from the edge and not where the hook of the hanger will later be. Use the photo as a guide.
I found it easier to use the pointed end of a compass.
8) Thread the string (roughly 6cm) through each hole.
Place the wreath over the top of the cardboard face and tie a knot with the string around the wire. Tie the knot twice and don't worry too much about cutting the excess off as it blends in with the fabric.
Tip: wrap a strip of fabric around the neck of the hook, so that any sharp points of the wire are covered and won't hurt little fingers.
My nieces had a great time picking out colours to use and creating something that they could do by themselves. I was surprised to see my younger niece, aged 5, get the hang of it so quickly.
Even afterwards, I had the best time making one myself as I used materials with memories significant to me: I included a green silk taffeta that I used to make a dress when I was 15/16, offcuts from a memory quilt I made which was used as the backing and shiny blue material that I used for screen-printing. The latter didn't go so well at the time so I'm glad I could put it to good use.
I also used white netting which added a nice volume to the wreath.
By the end, we all had a token of our locked-down summer. I'm hoping it will remind them of Auntie Bud and the fun they had when they were in the garden.
-----------------------------------
As a final note, I just wanted to say that it is amazing what the people around me will do when I need something for a reason so simple as a quick little project. Simply mentioning my plans and what I'll need and my challenge to find materials I don't have is halved. Essentially, I love my family and the community around me.
-----------------------------
Thank you for reading.All the love and keep safe,
Buddy xx
Previous Post: Opening up an Etsy Shop!
Where to Find Me:


