Photoshop Colour Palette Tutorial
 |
| Original photo #nofilter |
My relationship with Photoshop has developed over the years. It started a few years ago when I was introduced to the software for the first time. To be honest, I hated it. It frustrated me how I just couldn't get the hang of all the buttons and layers- my goodness the layers were frustrating, and still are at times. I avoided it at any cost and tried to use Adobe Illustrator for the majority of my work.
However, when it got to a project I'd undertaken that I desperately needed Photoshop for I found that I was able to push and teach myself the tools and wonderful effects on there. Recently I've found myself learning even more including life-changing hacks that mean I don't have to start all over again when I mess up.
Since I feel it's best to learn Photoshop by doing, In this post, I'm going to teach you how to create a colour palette from an image.
Like many things, there are about 5 different ways to do one thing on Photoshop and so this is one way that you can create a palette...
Step 1: Start off with a fresh page on Photoshop. I usually go for an a4 size but any is fine.
Step 2: Place any image of yours that you'd like to gain colour from onto the page, do this by dragging the image to the photoshop page and double-clicking. The blue border and cross should disappear.
If you want the image to be a different size then hold down the shift key and drag from a corner before double-clicking the image.
Leave a frame around the image for a place to put your swatches.
Often the image will be pixelated before being placed however this should disappear after placement.

This can be found on the left tool sidebar, however, if you can't see it it should be the 7th icon down; click and hold on the small arrow. If you still can't see it, look under all icons with an arrow.


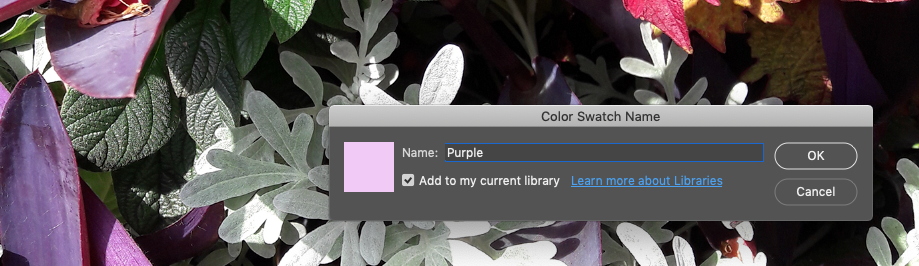


The new colour will appear in Libraries which can be found in the column right next to the Swatches tab. If you can't see it, most things can be found in the View window across the very top of the screen.


Step 7: Depending on how many colours you want and whether you want all swatches to be the same size and shape, click onto the layer your shape has been drawn on (A new layer will have automatically appeared and be labelled with the name of your shape when you drew it) and drag it to the new layer icon below this section (the new page symbol).
Click on the shape and drag it to the side. You should now have two shapes.
Do this until you get the wanted amount of shapes for your colours


(In the above image I've made each swatch pink to demonstrate that I've copied my rectangle 6 times)
Step 8: Click on the colour swatch after clicking on the shape. By doing this, the shape will fill with your colour.

Voila you have your colour palette!...

Colour palettes are used in creative industries when you start a new project. The colours and only these colours are used with your work.
I also find this process helpful to work out the exact colours in my image. Often they will look like one colour but turn out to be a completely different shade. This has taught me so much about deciphering everyday colours.
This is also an amazing process for painting from an image.
So I hope you have fun with it and remember that at first photoshop can sometimes feel a little frustrating. I would recommend trying this out just by having a play and without putting pressure on yourself. It can take some time but I can improve leaps and bounds at the end of a Photoshop day and feel so proud of what I've come out with.
Now, I can use both illustrator and Photoshop fairly confidently and I love them both. It took a while to get to this point- a lot of practising, playing around and guidance from more confidant learners- but now I get it and don't shy away. It's opened up a lot of possibilities and, like learning anything, my mind is stretched to more wonderful things I can make.
-----------------------------
As a final note, I'd like to say that I've not been asked by Adobe or Photoshop to talk about the software. I just simply wanted to share a tutorial in the hopes it will make any readers less nervy about using Photoshop. Saying that, if Adobe or Photoshop would like to get in touch, I'm cool with that *wink*As ever, thank you for reading today's post and I will see u again very soon.
Love,
Buddy xx
Previous Post: Mini Paperchase Haul and Student Organise Tips / Tangent
Where to Find Me:
InstagramBloglovin'
21 Buttons (Fashion)

